Showing posts with label review. Show all posts

Tuesday, 28 June 2016

REVIEW: Pony Effect Spray Paint Nail Lacquer

Nail polish used to be my thing, though I was never really good at using it, especially when it came to applying it with my left hand. I was also never good at keeping my nails unscratched, so they always looked ugly within a few days. Sometime last year, I started getting gel nails done, and I was so pleased at how pretty they were and how long-lasting they were compared to my own polish-painted nails! This eventually became my monthly hobby, and I would come up with different patterns and ideas for the lady to copy. Soft gel nails usually only last 2-3 weeks, but hard gel nails can usually last 4-6 weeks (of course by 6 weeks, the nails would've grown out too much and would look very ugly). Recently, I've been in hospital, and my nails had grown out so much that I had to get them cut by myself at the hospital. Eventually, two of them fell off by themselves, and that's when I noticed how soft and thin my nails had become - they were like paper! I knew I had to get all the gels removed, and take a break from gel nails.

This was when I came across these spray paint nail polishes! I originally only wanted to order the silver and blue, but then I realised they came in a set, and I could not purchase them separately. I ordered these from www.minikmall.com for HK$328 (US$41.60) for 5 cans, each can costs HK$65.60 (US$8.30). This set took around 2-3 weeks to arrive, because they said that spray cans could not be shipped by airmail, and needed to be shipped to HK via surface mail.

Pony Effect Spray Paint Lacquer Set (HK$328/US$42)


Colours:
#Secret Code (gold/yellow)
#PingPong Game (green)
#Chic Chico (blue)
#Go Play (purple)
#City Roller Coaster (silver)

The set also includes some stickers for you to decorate your nails with.


How To Use:
1. Apply base coat onto nails.
2. Give the bottle a good shake, and hold around 10-15cm away from your finger.
3. Spray onto your finger nail in a downward motion (towards fingertip). Repeat if necessary.
4. Apply top coat onto nails.
5. Wash away the nail lacquer on the skin with water.

To remove the lacquer from your nails, use your usual nail polish remover.

The Packaging:
They all come in a reflective gold cardboard box with a colour label on the top.


The cans look like this - not girly and pretty as such, and you can only see the colours from the front, but if I were to put these into a box, I would've hoped to see which colours I would be taking out on the lid, instead of having to guess the colour of each.


Here is a swatch of the five colours under natural lighting.


All the colours turned out pretty okay, except for the green. Even after a few sprays, the green still appeared to be thin, uneven, and cheap. The silver, blue, and the purple looked pretty good, though the gold was a bit too yellow for my liking. I actually quite liked the silver, as it's quite bold in colour, and it's unlike the colour of other silver nail polishes. I didn't add a top coating to these, as I wasn't planning to have multi-colour fingers. With the exception of the silver, all the other colours washed off pretty easily. I had to use my nails to scratch away the silver, as it wasn't as easy to wash off.

The next day, I decided to make my nails silver and blue. I added the base coat from Missha, the paint lacquer, and the top coat from Missha. The top coat actually makes the nails appear to be more glossy rather than matte. When I tried to wash off the excess paint on my skin, the blue on the nails washed off too (I didn't even rub it with my fingers). Most of the silver remained on my nails, but a little bit chipped off too.


The Verdict:
The idea behind these paint sprays are amazing, but only if the colours had stayed ON my nails instead of having being washed off so easily under water. I wonder what would happen if I washed my hands with soap and water! I also ended up having a blue sink, and I had to rub the blue off (I started off using nail polish remover, but it took too long and I had to literally scrub my sink, and then I started using my Young Living Thieves Household Cleaner, and it got the job done within a few seconds! These were fun to play with and easy to use (even with my left hand), but I would definitely not repurchase again! Will try again using a different brand of base coat and top coat, but I doubt it would make a difference!

If you want to find more about Young Living products, you can go here.

Thank you for reading, and have a nice day!

Thursday, 10 December 2015

My Winter Skincare Regime

GENIE IS BACK!!!

It's been SOOO long since I've blogged - I did become a little put off by the fact that one of my blogposts was suddenly deleted without my consent, and RSS Feeds stopped working anymore. Since then, I've been really busy with my life with the two kids, trying to find a job, my severe back pain, and MaskGenie. Most importantly, I just lacked the motivation to blog, especially not being able to find something that I really wanted to blog about and something that was worth blogging about.

In this blogpost, I'd like to talk about the products that I'm using now, after having switched to products suitable for the super dry winter climate.


Since November, I've been slowly incorporating richer products into my skincare regime. I've been using products from CNP Laboratory since summer, and it has really helped to boost the water level in my skin. During the home care facial that I had at Shiseido's as a part of the birthday special they offer for VIPs, they used a special device to check my skin, and they found that my face was highly hydrated (all thanks to the CNP Laboratory products I had been using), but my skin slightly lacked collagen.

When winter was approaching, I realised that CNP products were not moisturising enough for my skin (even after switching to a heavier face cream), so since then, I have been incorporating Shiseido products into my regime, though the first night I started using them all (I was too excited to try them all), I broke out on my forehead. This didn't stop me from continuing with Shiseido products though, but I did stop for a few days before slowly adding them back in. During the days that I broke out, I used these products:


CNP Laboratory Hydro Intensive Toner
LJH Tea Tree 90 Essence
CNP Laboratory Dual-Balance Waterlock T/U Serum
CNP Dortoray Intensive Hydrating Cream

I also used a few Dr. Morita masks to help calm my skin and soothe the breakouts.

After recovering from the breakouts, I slowly added the products into my regime, sometimes adding the emulsion, sometimes adding the toner, until my face felt stable and okay with adding them in.

I'm currently using up a random cleanser from Memebox - Awesome Aqua Whip Hug Foam Cleanser. Nothing special, doesn't clean very well and quite drying for the face especially in this weather. Will not repurchase.


 Currently using up another Memebox toner - Tosowoong Timeshift Skin Toner. It's more like a gel rather than a watery type of toner, not so moisturising, but it cleans very well and makes the cotton pad brown after swiping it on my face and neck. Will not repurchase. During the days after my Lipodermis treatment, I use the CNP Laboratory Hydro Intensive Toner instead, as my skin is very delicate then. Will consider repurchasing since this is very moisturising and gentle.


I don't always use an essence anymore (I used to use the IOPE Bio Essence Intensive Conditioning religiously, but stopped during summer), but when I remember to, or when my face reminds me that it's extra dry, I'll use the DM Intensive Hydrating Essence. The essence itself is great, leaves a slight sticky feeling, but the pump sucks. My sister-in-law gave this to me, but I don't know if I'll repurchase since it is kind of pricey. When my face is super dry, I'll apply the IOPE Essence before applying the DM one. This is my second bottle of IOPE Essence, but I'm not sure whether I would purchase a third one, since I don't use it as often anymore.


When I know I'll be putting on makeup the next day or when my face really needs that extra water boost, I'll use the Shiseido Ultimune Power Infusing Concentrate before using my usual serum, followed by the Ultimune Eye for the eyes. I realised that my makeup does adhere better, and my face is less dry after using the Ultimune line, but they are kind of pricey, so I'm not sure whether I would repurchase. I don't use these everyday, so I'm hoping they'll last me for a while before my next repurchase.


As for the serum, I have the most expensive serum that I've ever purchased - Shiseido's Vital-Perfection White Circulator Serum. I started with a deluxe sample, but finished that, and opened up the full size. I use two pumps of this on hubby's face, and his face reacts very well to it (did I mention that he breaks out using most products but not this one?), but I did break out on the first two times of use. I use 1.5 pumps on my face, massage it into my face, and a few times more on my cheekbones (where the hyperpigmentations are). May consider repurchasing but I'll need to save up for it.


I admit I've been lazy with eye creams lately, I think it's because CNP Laboratory products can all be applied around the eyes, so I've been too lazy to apply other things, but seeing it's winter, that's when lines start to appear, so I decided to do something about my dark eye circles and fine lines. I was looking for Christmas presents at Fresh when I decided I want something for myself too, so I got a Christmas Set that came with a Black Tea Eye Cream, a Black Tea Cream, and a Black Tea Sleeping Mask. Despite it being an eye cream, it's very light and easy to blend. It doesn't cause milia. The full-size product is really expensive, so I'm not sure whether I'll repurchase, but if it does do something for my dark eye circles and lines, I will consider saving up for it. Before I started using the eye cream from Fresh, I tried a sample of an eye cream from Shiseido that was really rich, but felt nice and smooth after blending, and really did seem to do something for fine lines, but I bet it's really expensive just by looking at the packaging.


As for the night cream, first off there's the one from Shiseido - Vital-Perfection Sculpting Lift Cream. It is rich and moisturising, not oily, but its perfumey scent is really strong. After realising that my face was okay with using such rich creams, I decided to take out my long lost favourite, the IOPE Super Vital Extra Moist Cream. I used to love this cream, but there was a time after I gave birth to my second child, that I couldn't use anything heavy on my face, otherwise I would breakout. I tried it again, and my face loves it again. The only problem with this cream is that if you take too much of it, it does feel a bit oily. I now use the little spatula I got from CNP Laboratory to scrape the top layer of the cream a few times to get what I need, and this ensures I don't get too much, because you really don't need a lot! Out of the two creams, I think I prefer the IOPE one, as it's actually more moisturising, and the scent is more acceptable. As for the price, Shiseido is more than double the price of IOPE! Plus, I still have two more deluxe tubs of the IOPE, so I won't need to repurchase in a while!


I also have another cream sample that I use - A-True Darjeeling Black Tea First Anti-Wrinkle Cream, but because it is actually quite light, so I use it in the mornings instead. Light in the day, heavy at night. The A-True cream actually smells like black tea which is really nice and relaxing. Probably won't repurchase though, since Memebox products are quite hard to source.


Every night, I apply the Fresh Sugar Lip Serum Advanced Therapy followed by the L'erbolario Shea Butter Lip Balm. I absolutely cannot live without this lip balm - this is my second one! I used to have serious flaking lips, and nothing would help except this lip balm! They recently ran out at the shop, so I got their Natural Glossy Lip Balm as a spare, but it's nothing like a lip gloss that you normally think of, nothing in the cosmetic sense, instead it's like a tube filled with different essential oils, and is super moisturising to the lips! It has a slight flowery-herbal scent, but nothing synthetic.


In the mornings, I keep it simple. I wash my face with cold water. That's it, no cleansers or anything, just plain water. Then, I follow with my Tosowoong toner, CNP Laboratory Waterlock T/U Serum, Shiseido Vital-Perfection Emulsion, and CNP Doctoray Intensive Hydrating Cream or A-True Black Tea Cream. The CNP Laboratory Dual-Balance line is my absolute "go-to" for summer - I used the toner, serum, and cream from the same line during summer, whilst hubby uses the A-Clean line!


Next, I apply my CNP Doctoray Real Perfect Sunblock which has a UVA PA+++ and UVB SPF 50+, AND it has a slight tint to it (I blogged about the summer edition before, but that's the post that got deleted), but I really can't tell you enough by words how much I love this! My face is matte and oil-free all day long!


If, for some reason, my skin feels dry during the day, then I'll use a mist spray - I swear by the Recipe By Nature Spray Essence Water, but if I'm wearing makeup, I'll use the Recipe By Nature to prep my skin before applying makeup, and the CNP Laboratory Quick Soothing S.O.S. Mist over makeup. I've lost count of how many Recipe By Nature mists I've used, but it's definitely a lot, and the great thing is that it's free from mineral oil, synthetic fragrance, synthetic dye, triethanolamine, and parabens! The S.O.S mist is great as not many mists can be used over makeup, and this one can because the particles are very small, and won't leave droplets over your face after spraying. The S.O.S mist also smells of rose, but it's not overwhelming or annoying.


Other products that I use every now and then:

Clarins Gentle Exfoliator Brightening Toner
I actually like its predecessor more (I blogged about it here), but this one is still pretty good and convenient to use. Not suitable for sensitive skin.
CNP Laboratory Deep Enzyme Powder Wash (click here for the review)
Absolutely love this powder wash - it's very gentle, yet it cleanses and minimises pores.
CNP Laboratory Anti-Pore Black Head Clear Kit (click here for the review)
I absolutely swear by this blackhead set, and would definitely recommend it to others! After using the first mask, all the impurities really float to the top, and it doesn't require much effort to squeeze out the blackheads using a blackhead extractor!
Fresh Black Tea Firming Overnight Mask
Started using this recently. There's no need to apply night cream before using this mask, only requires a thin layer, and leaves face feeling super moisturised - probably will not repurchase due to the high price tag.

I also use lots of different masks - sheet masks, sleeping masks, and wash-off masks.


That's a lot of CNP Laboratory products as well as the newly added Shiseido into the family! I must say that my face really does look flawless and has a glow after incorporating Shiseido products into my daily skincare regime! I also have a Lipodermis treatment done every 3-4 weeks, and I've noticed that my skin is back to being flawless, as well as my pores being slightly minimised. The only downside to these treatments is how painful they can be - it's like a facial scrub, but much more intense, and much more painful! Will talk more about them later in another post.

I used to be reluctant to use and eat products made in Japan, especially after the radiation leak, and having heard several stories from friends and families about the side effects and things that happened to their close friends after visiting Japan and everything, but nonetheless, one day I decided to try some of their makeup products since I've heard many good things about their products, and that's when I received some of their skincare samples to try, and I absolutely fell in love with the results! By the way, I love their makeup products too, but those will have to wait for another post.

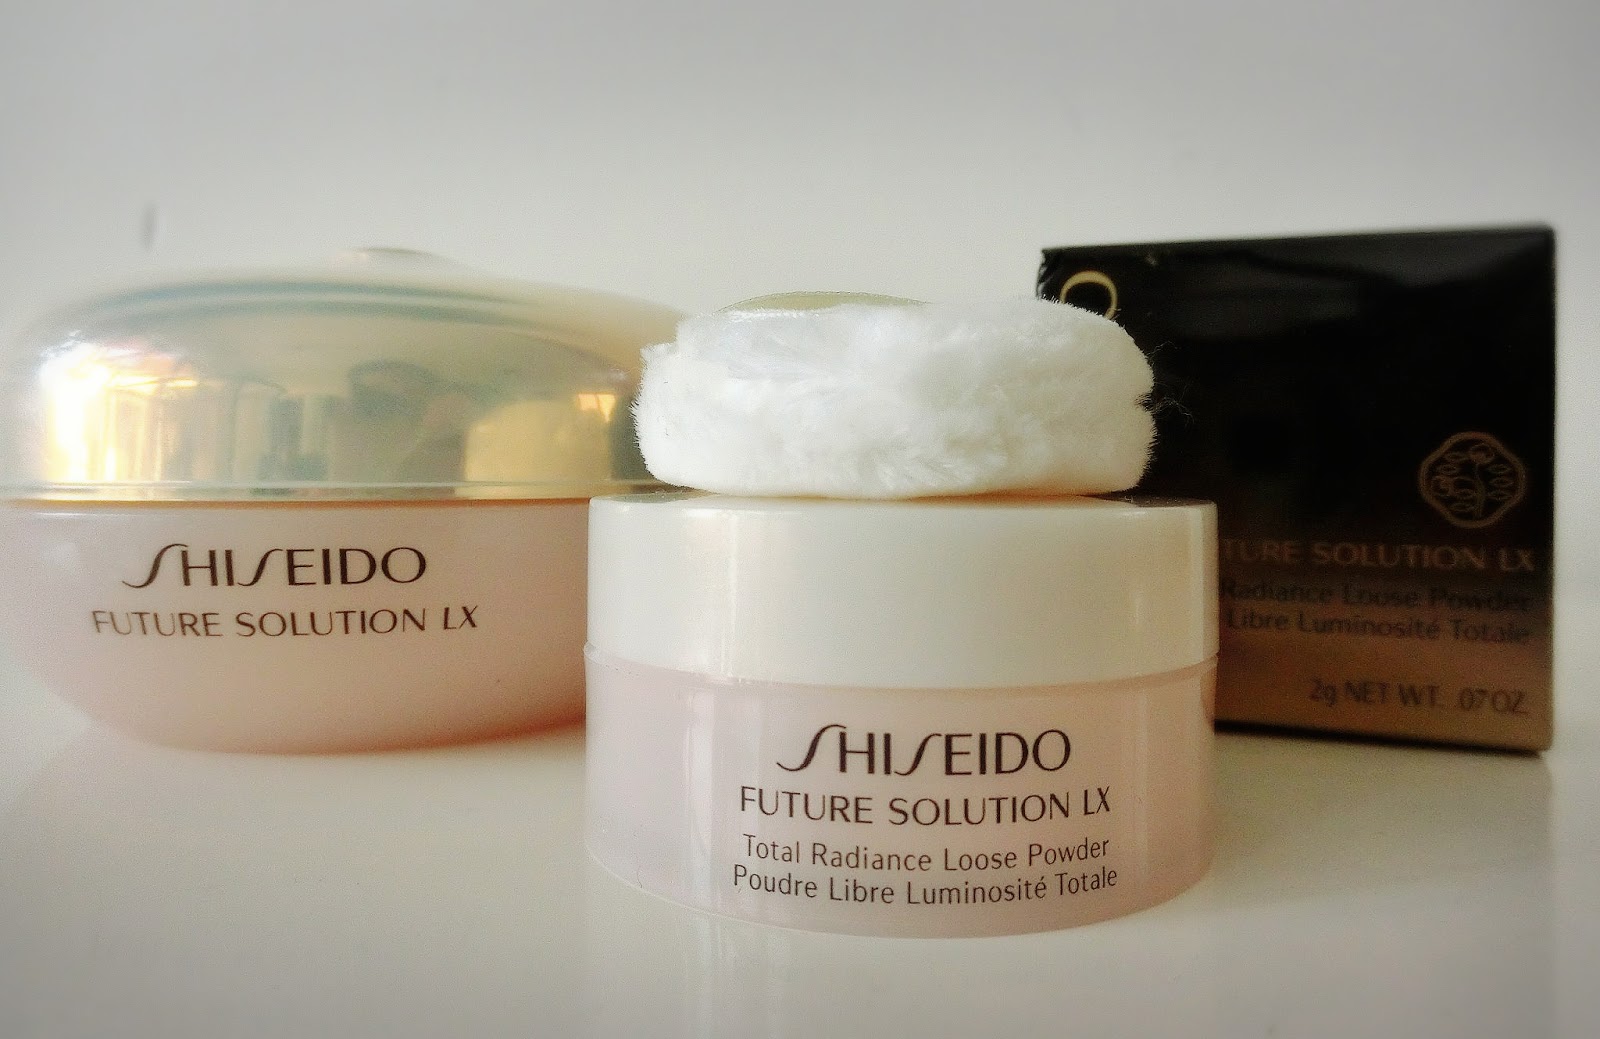
As you can see, the Shiseido products that I have are mainly in sample sizes. Shiseido gives out many samples to try, and I have yet finished them all, so I haven't purchased anything in full size other than the serum. The only thing I don't really like about Shiseido's products is probably the perfumey smell and the high price tag to them, but other than that, Shiseido is awesome and I'd definitely recommend this brand to friends and family! Shiseido always comes out with these trial packs, and they're a great way to be able to try everything! Shiseido HK also has a VIP programme, so that's even more samples to try, as well as having birthday treats and discounts! What's more is that they even have samples for loose powder and other makeup items! Look below at the photo where the tub on the left is the loose powder in its full size, and the one in the middle is the deluxe size, and the deluxe also comes with a small puff inside the container! This loose powder is the best I've used, like seriously!


Okay, so that's a fairly long post with lots of products and lots of photos. I hope to see you guys soon in my next post, which hopefully won't take another 6 months to write.

Thank you for reading, and have a nice day!

If you guys have any questions about the products, please comment below :)

Saturday, 16 May 2015

REVIEW: CNP LABORATORY ENZYME POWDER WASH


During my CNP Laboratory haul, I got a free bottle sample from the shop, and my, it's quite a big sample with quite a lot of uses.This is the first time I've tried an enzyme wash, but I've heard many great things about it before.

I feel that the traditional Korean peeling gels aren't really effective, as I've tried rubbing the peeling gel on different surfaces (including the stone bench top), and the same rubber pieces still appear. I've also been told many times that scrubs are too harsh for the skin, especially if you have thin and sensitive skin like me.

So here I am with my powder wash. It's not the first powder wash I've tried though, as my first was with a Japanese brand, Fancl. The difference between the two, is that the Fancl required the use of a sponge to foam up, whereas this enzyme powder wash foams up with water alone.

So, back to business, this is the
CNP Laboratory Deep Enzyme Powder Wash.

Full Size Product: 70g 


Ingredients
Mixed fermented complex (pomegranate fermented extract, pu'er tea fermented extract, bean fermented extract), green tea EGCG

Product Description
Plant originated protein decomposition enzyme cleanses old impurities deeply.
Creates smooth skin texture.
Enzyme removes dead skin cells on skin surface to activate turnover period and create healthy skin.
Fine lather exfoliates without burden to the skin
Skin remains moisturised skin without dryness after cleansing
Contains niacinamide and rice bran extract for dull skin improvement to brighten the skin.
Enzyme in the powder wash activates the best among 35-40 degrees.
No additives, artificial colours, talc, benzophenone, mineral oil, alcohol, silicon, sulfate, surfactant.


How To Use
Pour a moderate amount into your palm and add some water.
Add some water to create enough lather.


Apply the foam all over the face, and gently massage.
Rinse off with warm water.
Apply 2-3 times a week depending on your skin condition.


Tip 1: Put some water to the powder, and rub against the face for a scrub effect. *Avoid the eyes
Tip 2: Rub the powder to wet nose to remove sebum and blackhead.
Tip 3: Mix the powder to your usual facial cleanser for a richer lather and deep cleansing effect.


You only need around a penny size worth of product to work with. There's a slight fruity scent, but not artificial or too overwhelming. It foams up easily with water, but it may feel slightly beady at first when the powder is still dissolving. The powder only foams up slightly, as it does not contain any foaming agents. After rinsing the foam off my face with water, I instantly noticed that my face felt super soft, smooth, and pores were minimised. My face did not feel dry afterwards.
There were so many uses out of the small bottle that I still haven't finished my bottle yet, though I went to buy myself a full size product during the Mother's Day promotion. I use mine at least once or twice a week, and have loved it since! I'm really loving CNP Laboratory so far!!


Rating: 10/10

Thank you for reading, and have a nice day!

Thursday, 14 May 2015

REVIEW: OSEQUE HIGH-END TOUCH SPF34 PA++

This product has been continuously showing up on my Facebook news feed, so as a beauty blogger, I knew I had to get it!

This is the Osèque High-End Touch in shade 21 Light Beige. This product was also mentioned in the "Get It Beauty 2015", hence its popularity.


The Osèque High-End Touch comes in two shades:
#21 Light Beige#23 Natural Beige

Volume: 30ml


Product Features
Soft and fantastic colour
Soft moisturisation all day long
Colour which improves the beauty of all types of skin tone
Youthful skin with dazzling sparkle
Contains new material RonaFlair® (sapphire structure)
Fine wrinkle hiding effect using light diffusion
Expression of 3D facial features
Moisturising and nourishing makeup
Contains propolis, fermented bifidus lysate
1 bottle of essence for reinforced nourishing powder
Makeup and skin care at the same time
Convenient applicator
Roller type for easy and convenient application on curvy facial features
No lumping even after multiple applications
Sebum control for maintenance of balance
Moisture upon application, with fluffy finish
Sebum control for refreshed makeup all day long
Whitening care with blemish elimination
Wrinkle care for firm skin
Sunlight and UV ray blockage (SPF34, PA++)

Major Ingredients
Lorna flare (synthetic sapphire) , propolis extract, non-seafood appetiser for fermentation, six kinds of plant callus culture extracts (green tea, cactus, rice, tomato, carrot, lotus).

It comes in an elegant and sleek, black plastic bottle with a roller applicator. The lid (and even the shape of the bottle) reminds me of Chanel's products.


The roller applicator is perfect for lazy people like me, as there's no need for foundation bases or brushes or sponges anymore; however if you don't like the idea of using a roller on your face, you can easily pop off the applicator and apply it with your hands or usual applicators.


When you press the button on the side a few times, the foundation will leak out, so that you can easily roll it over your face. It does, however, get a little messy if you press the button too many times, and too much foundation squirts out at once. Sometimes, the foundation doesn't roll onto the roller applicator, so you may need to use your finger to wipe it off the applicator to put onto your face, then to use the roller applicator to blend.


The Osèque High-End Touch comes with skincare benefits too ~ anti-wrinkle, whitening, and SPF34, so it's not just an ordinary foundation! 


How To Use

After using your usual moisturiser, press the switch on the container, and roll the roller puff evenly onto the face. Press the switch several times so the contents are squeezed upwards. To wash the puff, old the puff and pull upwards to detach.


If you have trouble getting the foundation on the corners of your nose, you can try dabbing the applicator onto the area instead of rolling it on.


If anyone is interested, I did a tutorial & review video on the Osèque High-End Touch. I just realised that it's a pretty long video (oops!).


COMPARISON: OSÈQUE High-End Touch vs. JENNY HOUSE Perfect Skin One Shot Cover Stick Foundation


In the first photo, I only applied the Osèque High-End Touch onto the left part of my face. If you look carefully, you will see that my dark eye circles are less dark, but it didn't really change the colour of my skin. There are no obvious differences yet. 


In the second photo, I am applying the Jenny House Perfect Skin One Shot Cover Stick Foundation onto the other half of my face.


If you look carefully in the photo below, you can see that my dark eye circle is concealed better on the right hand side. I do have quite a few moles (as shown in the photo above), but the small one below my eye is not as obvious anymore. The Jenny House Stick Foundation does a better job at concealing dark eye circles and small moles.


On the left: Osèque High-End Touch
On the right: Jenny House Perfect Skin One Shot Cover Stick Foundation

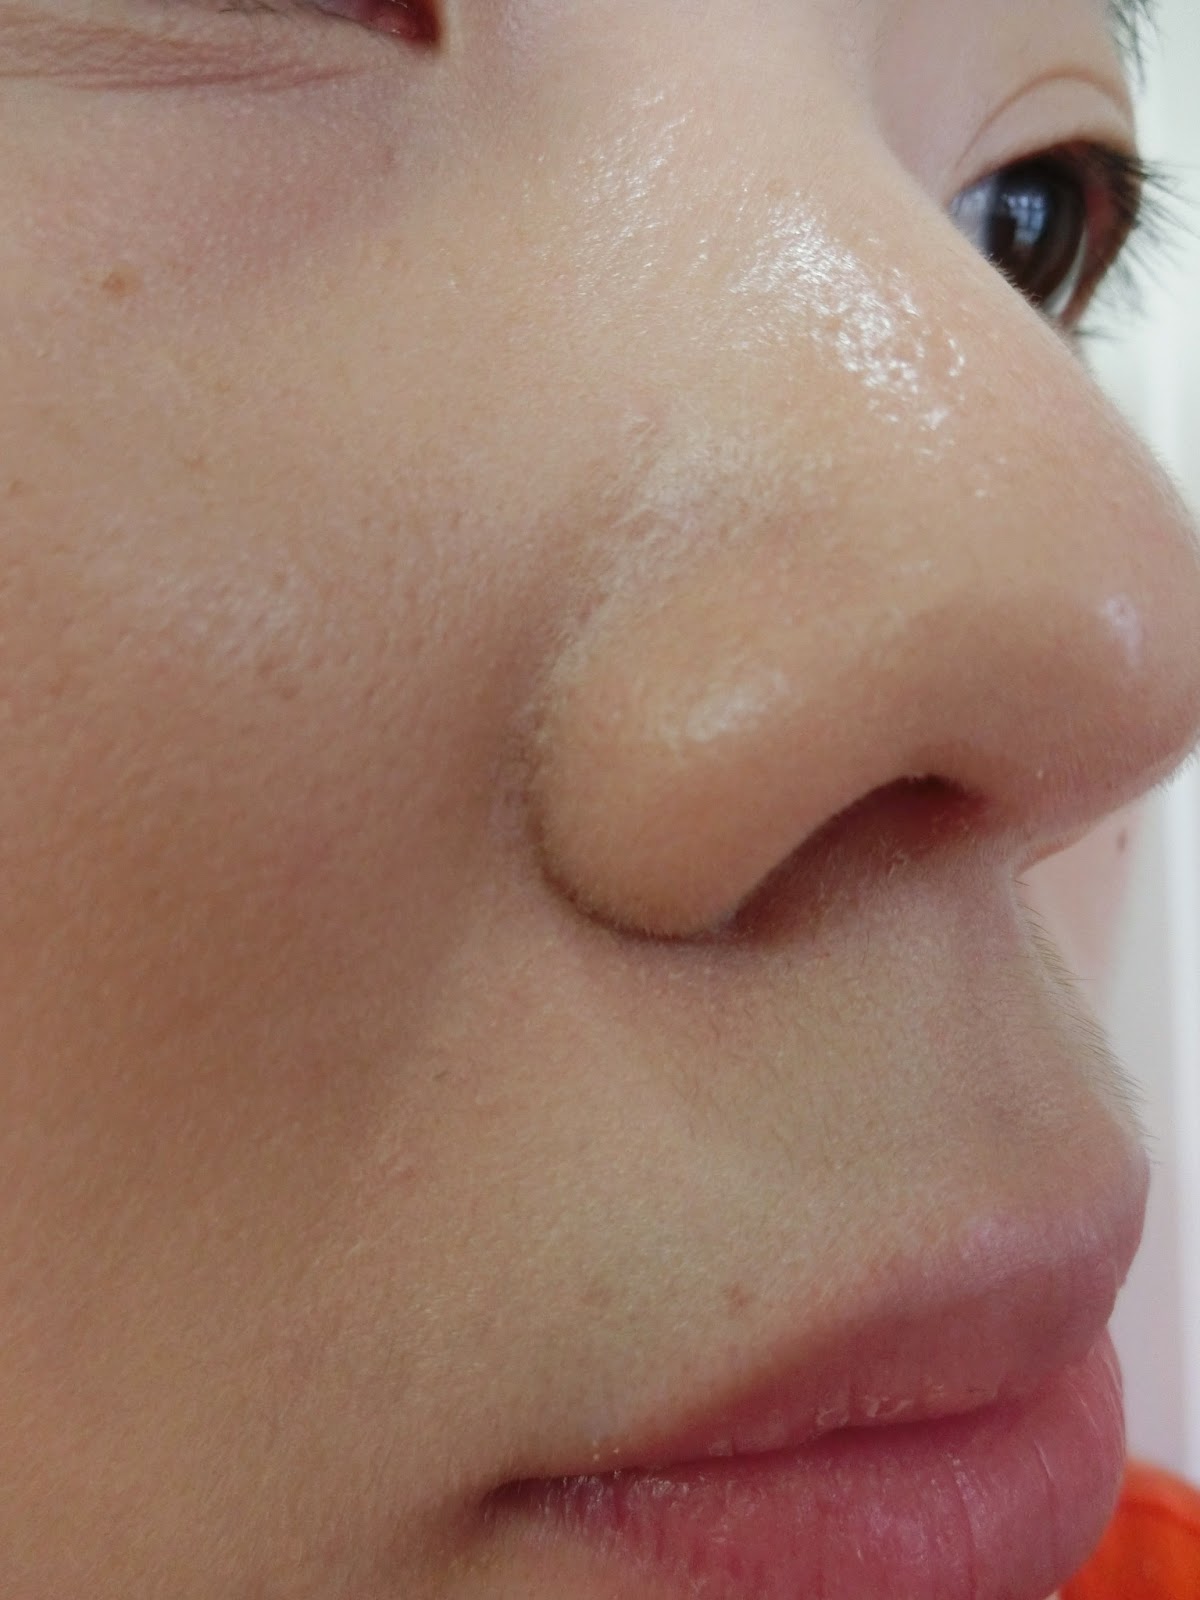
As you can see, with the photo on the left, the pores on my nose are not obvious, whereas with the photo on the right, the foundation seems to be stuck inside the pore. The Jenny House Stick Foundation is obviously more dry, as it is, after all, not a liquid foundation, hence sinks into the pores, so until the nose starts creating oil, the pores will still appear to be powdery. So, in this case, the Osèque High-End Touch seemed to do a better job at making the face appear poreless! As for the fine lines under the eyes, I think both give similar results, but Jenny House's Stick Foundation is slightly better, due to the better concealing function.


Overall, I think the Jenny House Perfect Skin One Shot Cover Stick Foundation still wins. The reasons are:

1) It's in the form of a stick, so it won't leak or spill, so it will be easy to carry around.
The button on the Osèque may accidentally be pressed when put inside your handbag, so it may leak.

2) The design is really convenient, as my hands don't get dirty your hands at all.
The Osèque can get quite messy, and you may need to use your hands to apply the foundation onto your face, before using the roller applicator.

3) It gives more coverage, so I don't even need to use a concealer unless I have a pimple or something big to cover up.
The Osèque gives a more natural look, so its coverage is very low.

4) It leaves my skin matte even after a whole day outside.
The Osèque doesn't make my face oily, but the finish is more dewy.

5) The retail price is much cheaper than the Osèque (Jenny House is selling for USD25, whereas the Osèque is USD33).


Overall, the Osèque High-End Touch is a good product if you don't need much coverage - it gives a natural look for everyday wear. The colour stays and doesn't wear off until you wash it off with makeup remover. It is very light-weight, isn't drying for the face, and makes your face look brightened. The bonus is that it contains many natural ingredients, as well as a serum included, so that it is not only a foundation, but also a skincare product. The main downside of this product is still its applicator, as it can get a little messy.

Rating: 8/10


Thank you for reading, and have a nice day!

Sunday, 15 February 2015

REVIEW: JENNY HOUSE PERFECT SKIN ONE SHOT COVER STICK FOUNDATION

I've been so busy lately that I haven't really had time to update my blog, especially after I've realised how easy and convenient YouTube videos are compared to blogging, however, I think videos can't always show how great things are, so here, I've decided to write about it instead!

The product that I'm going to review today, is...
"Jenny House Perfect Skin One Shot Cover Stick Foundation".


A portable 3 in 1 (Base + Sunscreen + Foundation) perfect skin cover stick foundation can transform your skin through instant skin perfection and long-lasting makeup. Its advanced lightweight formulation delivers a very subtle sheen with high coverage and great adhesion to your skin. Patented Vitamin-C complex core essence illuminates your complexion and whitening your skin, also visibly minimises all imperfections, pores, fine lines, and dark spots instantly and over time.

Lightweight, breathable, silky hydrating base with high coverage that make your skin become a beautiful flawless airbrushed finish without any stickiness. It helps to keep you looking and feeling your best through any season. Its high coverage, great adhesion and long-lasting formula that leaves your skin looking virtually flawless without a trace of heavy foundation after blending like a natural born beauty.


It comes in a pretty silver box, and the product itself is also wrapped in silver, with a pink bow at the top.

Why did I get it? I was really tempted to get it after watching videos that appeared on my Facebook newsfeed! I'm so glad I bought it, because now I'm in love with it!

This is a foundation stick that comes with a sunscreen level of SPF50+/PA+++. The foundation stick comes in two parts - the bigger circle with the foundation, and the smaller circle with the sunscreen and serum - they come out as one, so problem there!


The fun thing about it is that the foundation is on one end, and the brush is on the other. The brush is also at a slanted angle, so that it's easier and less tiring to use. 


The bristles of the brush are super soft and silky, so it doesn't cause any irritation to the face whatsoever.


There are two shades to choose from:
No. 21 Light Beige
No. 23 Natural Beige


How To Use:
1. Gently twist the bottom part of main container for 0.5cm of stick foundation then apply a thin layer directly on your face, no primer is needed generally.
2. Use the built-in special designed professional foundation brush for blending the foundation inside out evenly onto your skin in order to get a flawlessly blended, full coverage, high definition results. Re-apply it as a concealer on specific spot area for building up some extra coverage there if needed.


I did a video to demonstrate how to apply the Stick Foundation:


The shade I'm using is the No. 21 (I also use the N21 IOPE Air Cushion XP). The foundation is very creamy and very easy to blend in (it does take some time, but it'll be perfect after you're done!). It doesn't even feel like I've got anything on my skin, and it doesn't block my pores! It's not sticky too, doesn't need a lot of loose powder to cover up, and my face doesn't look oily at the end of the night!


It matches perfectly with my skin tone, perhaps slightly white on my face, but it gives my skin the kind of glow that it needs!


"At the end of the night" look - still flawless and non-oily (with no touch-ups during the night)! I had a few bumps on my forehead that night, but the foundation stick did an awesome job to cover them up (my concealer sucks, so the foundation stick definitely takes the credit)! I guess I forgot to mention that I use minimal makeup each time, so what you see is what you get!


I also forgot to mention that in the past, my face would normally feel super dry after a day of makeup, and I would urgently need to use a face mask that night, but since using this foundation stick, I haven't had this problem anymore!

The only complaint I would make would probably be the silver packaging, because all my fingerprints get stuck onto it and makes it not so pretty, but it's easy to wipe off so it's not too bad!

Price: HKD188 (equivalent to USD25)


Let's compare this to my previous favourite...
IOPE Air Cushion XP in N21


I really liked this before because...
1) the colour was a perfect match to my skin
2) it's really easy to use
3) it's not drying on my face

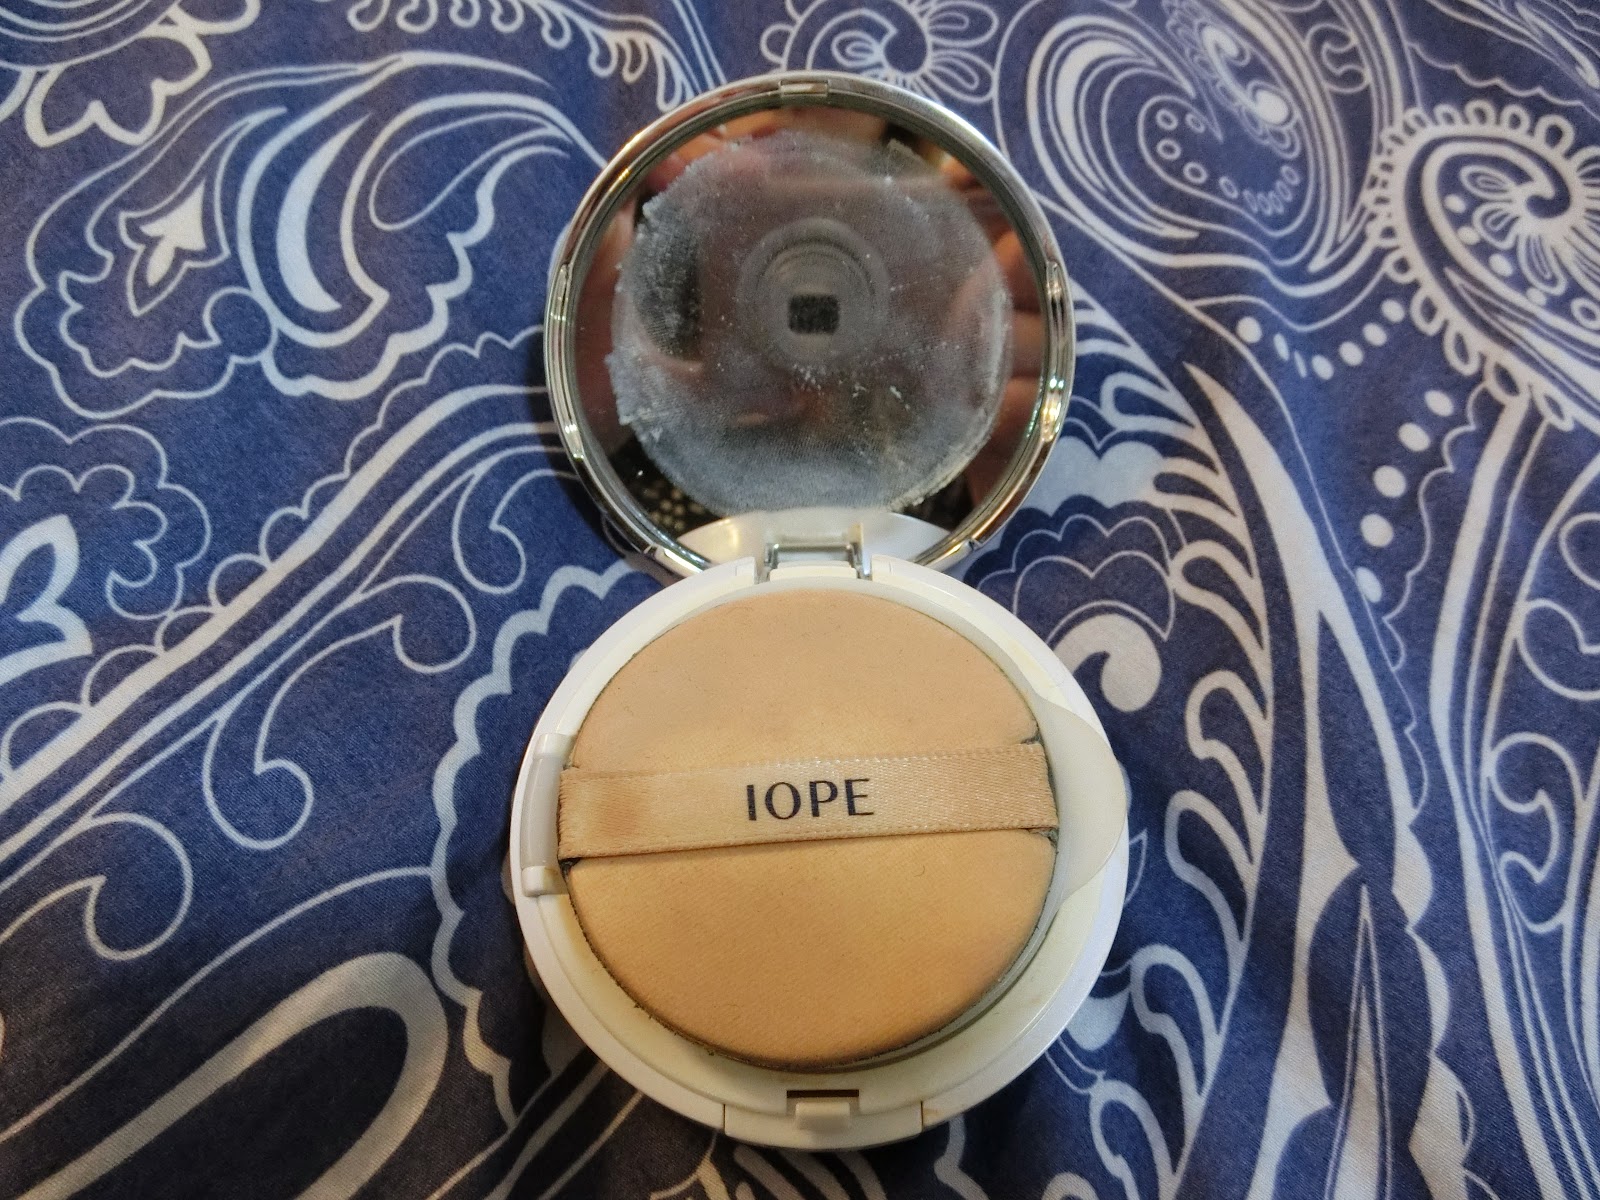
But what I don't like about it is that using it was very messy to use (and I don't like my things to look dirty!). As you can see from the photo below, the puff has already changed to become a beige coloured puff, but I've only used it a few times (every time I dipped the puff into the cushion, the foundation would all float to cover the sides of the puff). The mirror is also very dirty too, though it was never clear enough to be a mirror in the first place. The most important thing is that the cushion is already used up, and I've only used it a few times, so it's quite pricey for something that can only be used with a few uses! It also left a sticky feeling on my face, required me to apply a lot of loose powder on top, and yet still had an oily nose! I guess it's really not suitable for the humid weather we have here in Hong Kong!


Enough rambling over my new product...I bet you guys want to know where I got it from or where you guys can buy it (goodwillbeauty ships worldwide too!):


Thank you for reading, and have a nice day!

The italicised phrases are copied from www.goodwillbeauty.com.hk.